Setting up FaceIt for facial posing in Blender
This guide is for the amazing Blender Plugin FaceIt by FBra! Here I use a Cyberpunk 2077 model.
Blender version is 2.93LTS
1. Open your model in default pose, not any of your own poses! A few steps before using faceit:
- Separate the eyes into left and right meshes
- Separate the teeth into upper, lower and tongue meshes
- Merge Verts by Distance on the head mesh, set value to 0.00000001
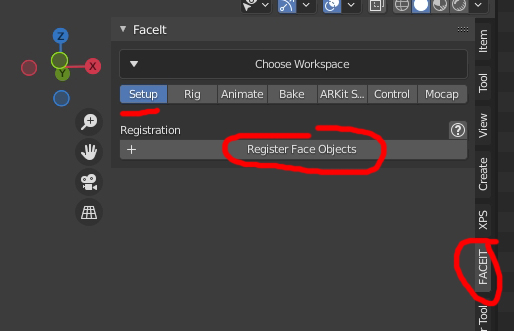
2. Select all face objects (head, teeth, eyes, eyelashes, eyeshadow, eyebrows, piercings, scars, cyberware, makeup, blemishes,...) and in the FaceIt tab hit "Register Face Objects".
Do not select: hair, haircap
If this side menu does not show for you, press n.
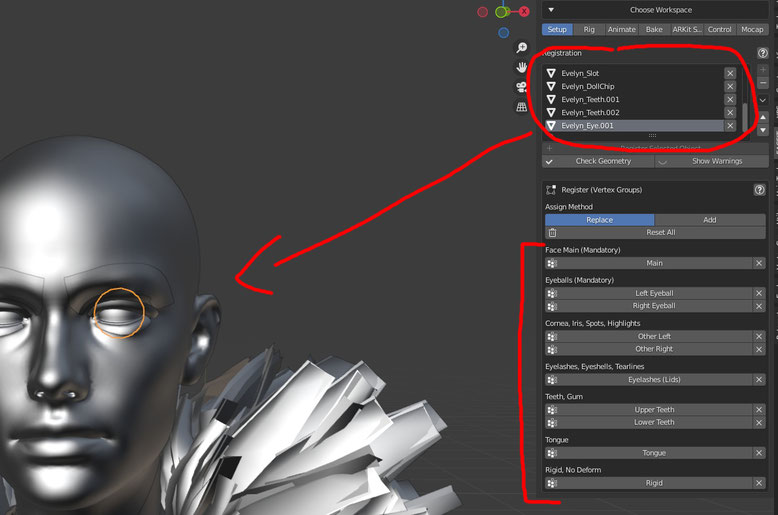
3. This will open a new tab, which is a list of all these objects. Use that list to select a mesh, then click on the matching button below to set it up. The selected mesh will highlight so you can tell what is what.
Head is Main
Eyes are self explanatory
Same for Eyelashes and Teeth parts
Overlays like eyebrows, cyberware, makeup, eyeshadow etc don't have a specific group so don't click any button for them. They will be weighted to move anyway!
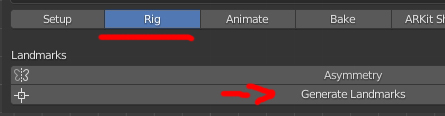
4. Now switch to the Rig tab and hit the Generate Landmarks button. If your face model has a lot of asymmetry you can activate this option.
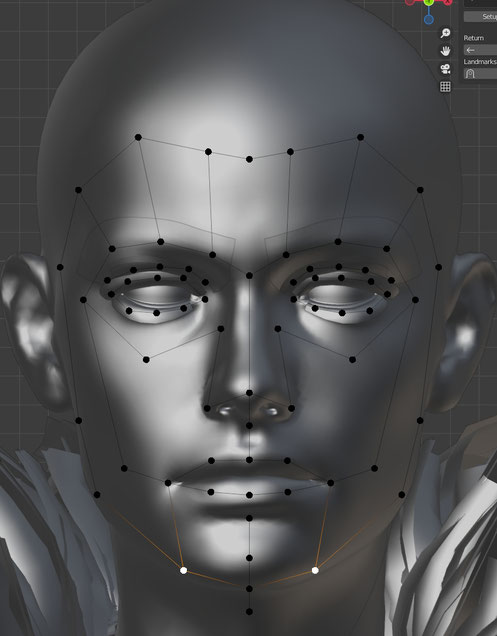
5. This will change the viewport to a orthographic front view, don't change it! A Grid is attached to your mouse now, place it with clicking (depending on your settings may be right click) like below:
- First align chin
- Then align eye height
- Then align eye width
Once that is done you can place the little dots so the features fit better. A correct example:
6. Now hit 'Project Landmarks', this will put you in a side view for further adjustments. Sometimes things will spazz out and place far away from the face, fix it here. After you fixed it, you can change view and see if the front view is still good or not (sometimes, esp with asymmetry it will mess up and you have to fix).

7. Click "Generate FaceIt Rig" and then "Bind", don't change its settings in the popup. This step may take a couple seconds so don't worry if Blender becomes unresponsive for a moment.
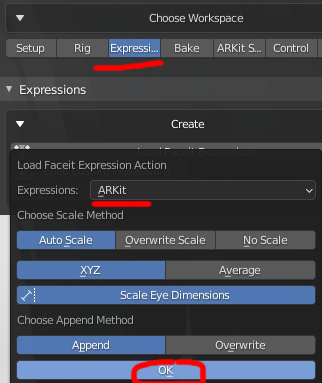
8. Go to the Expressions Tab now and click "Load FaceIt Expressions" and use these settings:
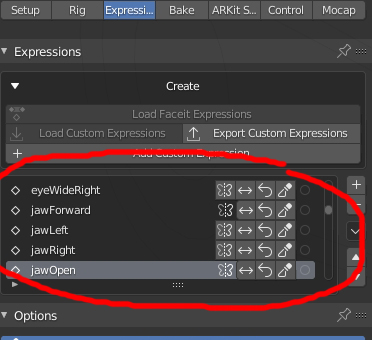
9. You'll get a list of expressions, this is for testing if your rig works okay so you can just click through them and check for weight errors.
10. If it all looks okay, go to the "Bake" Tab and hit "Bake Shape Keys".
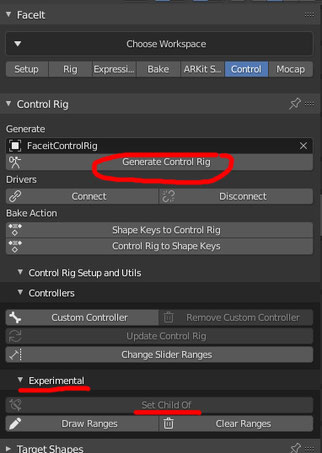
11. To make the face rig move with the rest of the skeleton, an additional step is required. Go into pose mode of your MAIN armature. The one with all the body bones etc. Select only the Head bone, then switch back to object mode. Select the head mesh again.
Now go into the Control tab in FaceIt and press "Generate Control Rig".
After this, select the control rig and AFTERWARDS select the main skeletpn. Then press the "Set Child of" button.
That's it! You can now go into pose mode on the control rig to create facial expressions. It's very UI like and you just select points and controllers and drag them around with g. You'll see it's very very easy :)
Happy Blendering!
- xBaebsae