Item Additions using WKit, ArchiveXL and TweakXL
For my item additions I have an easy to use template, which will be used in this guide. This is beginner friendly and should be easy to follow :)
Requirements:
Wolvenkit (I use WolvenKit-8.8.2-nightly.2023-03-08, but any recent version will do)
1. Download my resources and unpack the folder somewhere you will find it.
2. Open the .cpmodproj in Wolvenkit. On first opening it should look like this:

3. Head to xbaebsae_item_addition_template\source\archive\ and rename the folders and files to something representing your mod.
Notes for naming:
- all lower case
- unique names:
I highly recommend to put your username in front on all files, except meshes and textures. Why? ent files using the same name, even in a different folder, may conflict with mods that use the same name. If you add your username it makes this a lot less likely to happen.
Example of safe naming:

4. In this example I will add
base\characters\garment\citizen_fashion\torso\t2_062_dress__layered_leather\t2_062_wa_dress__layered_leather.mesh as an addition. In the Asset Browser in Wkit you can navigate to this folder in the game files. Then you double click the file to add it to your project.

5. Right click the template's mesh and choose Rename. Now copy the entire path that shows up and close this window afterwards.
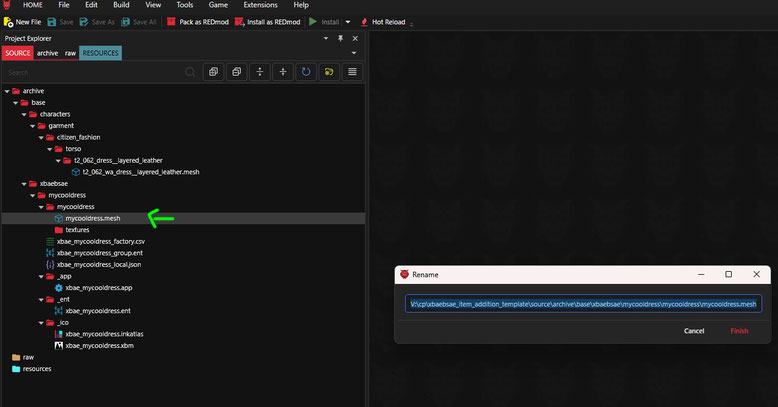
6. Right click that same mesh and choose Delete. Now rename the vanilla mesh you added and paste the whole file path over its original one.

Now the dress mesh is inside the template again.
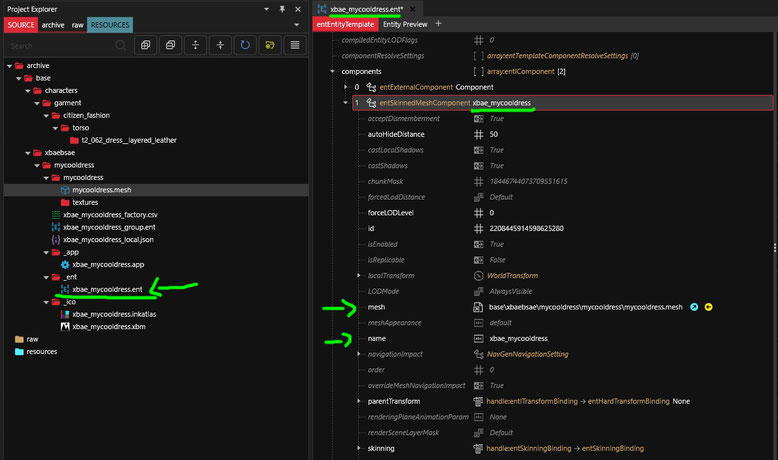
7. Double click the .ent file inside the _ent subfolder. This is the item entity file (not to confuse with the group entity file).
Here you expand the field 'itemname' and change these two values:
Instead of itemname type your item's unique name.
Paste the mesh path from 'base' onwards. TIP: In wkit you can right click any file in your project and choose 'Copy Relative Path'. This is the path you need here! So simply copy the relative path of your mesh and paste it over the default path in this entity.
Save and then close this file.
8. Now let's see which appearances we have inside this mesh. Open the mesh by double clicking it and expand the 'appearances' field. Here you will see all the saved Mesh Appearances inside the model. For reference, feel free to leave this tab with the mesh open.

In this guide i will add two of these.
9. Open the .app file inside the _app subfolder. Expand the field called 'color' and change the name of it to the first name inside your Mesh Appearances. For this dress that is simply 'default'.

Expand partsOverrides a few time and change the itemname to your unique one again. This has to be identical to the one you put inside the item ent file in step 7.
With the field meshAppearance you tell it which Mesh Appearance of the dress it should load. Here this is still 'default'.
Note about default appearances: If the mesh file doesn't have an appearance explicitly called 'default' it will treat the first one in the list as such.
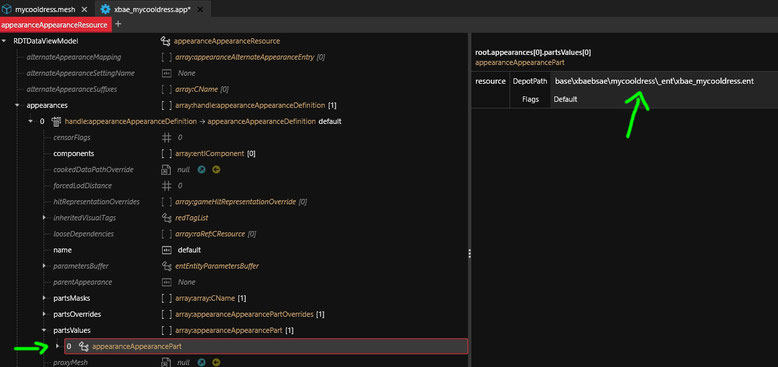
Also, copy the relative path of the item entity and paste it where it says partResource.

Expand partsValues and paste the same item ent path also there:
10. To add another color of the item, right click the default appearance and choose Duplicate Item in Array/Buffer.

That creates a copy of the whole setup we just did. Customize the copy to load the correct meshAppearance. These are the only two fields you have to change for that:

Repeat this for all the colors you want to add. Then save and close this file.
11. Open the _group.ent and check the appearances field. For the name, choose again your unique item name + the color you set up inside the app file. The appearanceName field is exactly that, you put the name of the appearance inside the app and below that you paste the relative path to said app. Like so:

You will notice that I have two &suffixes in the name here. They are important and sometimes slot dependent. The Gender one should always be added, this specifies wether that appearance gets loaded on femV or mV.
So &Female tells the game that this is for femV.
A camera suffix (TPP and FPP) is used for all slots except legs and feet. This is because you might want to use a cropped mesh in first person in case the neck clips into the view. For this dress we don't need it, but we still need the suffix.

&TPP here tell the game to load this appearance for whenever V is in third person view (Photomode, Inventory, Mirror).
Since we want to use the same appearance for first person, we can duplicate this setup and simply switch TPP for FPP like so:

To add more colors, repeat this and change the names:

Save and close this file.
12. Editing the _factory.csv is quick and easy. You add your unique item name and the path to the group ent.

13. To add localisation for your item (name and description that show up in the inventory and stores), edit the _local.json. You can open it in wkit and edit it there.
You can pick different localisation for femV and mascV by defining the femaleVariant and maleVariant.
IMPORTANT: femaleVariant is the default! If you don't define a maleVariant, it will default to the femaleVariant.
My example entries for what we have set up so far. I always use the same description for all colors, but if you want you can add a separate one for all.

The 'secondaryKey' is something that also needs to be unique so i recommend the unique item name + color + name or desc (to tell them apart). We will need it in a sec.
14. Packing and installing can be done with one button in Wkit. Just click this and your archive will be packed and placed into archive\mod automatically.
